
There are many ways to pour a concrete slab, but utilizing the correct equipment, time, and patience will always yield the best results. We’ll show you the tools to help you get started pouring a concrete slab for your next job, backyard project, and more.
Once you have a decent sketch of the area you would like to pour, start building your concrete forms using 2x4 wood boards. A well-built form will provide a better finish for your concrete slab. Make sure you double check your board’s length and angles twice before moving forward. Once in place, spray paint the ground around your boards and then remove the forms. This should give you an accurate outline where your concrete slab will later be poured.
Tip: Forms with a slight slope will help direct water flow from one end or the other to reduce water build up on top of the slab.
 |
Begin digging inside your spray painted outline so that you can lay your form into the ground. Secure the form with stakes, while making sure that the wooden forms stay square and level as you move around the perimeter. Next use a reciprocating saw to begin cutting the stakes flush with the wooden form. You will need a flush wooden form when you pour the concrete, so you can easily screed the surface.
Tip: When staking in your wooden form, screws work better than nails
Next, you will next need to level the grade inside of the wood form. Remove soil so that the base of the soil meets the bottom of the wooden form, making sure to clear the area of any debris, larger rocks, shrubs, grass, trees, roots, or even older concrete that may later interfere in the concrete pouring process. Replace the soil with compactible gravel or crushed stone; this will be your subbase. Professionals may choose between open grade or closed grade stone for their subbase. Finer grade stone tends to be more expensive, but is better for compaction for a sturdier foundation. If you are on a budget, open grade stone is harder to compact, but lacks smaller stones, which lets more water pass through. You will need to lay 4 to 8 inches of your chosen subbase. Depending on the size of your desired concrete slab you can use a hand tamper or a gas powered plate compactor. Plate compactors will achieve the most even and stable compaction for pouring a concrete slab. If using a plate compactor, start by looking for a model between 200 to 250 lbs or heavier.
Once your subbase is compacted, you will now be ready to begin laying rebar. You can cut rebar with a band saw for the best results. You may also use a reciprocating saw or circular saw equipped with a blade graded for cutting metal. Develop a rebar grid such that the edges are no more than 3-4 inches from all sides of your wooden form. You may use metal tie wire to hold everything together.
Once ready for pouring the concrete, depending on the heat or amount of sunlight you may want to wet down the soil, which can slow down the curing process of the concrete and extend the finishing time.
Tip: Do not add too much water, as this could lead to seepage up into the concrete and damage the slab.
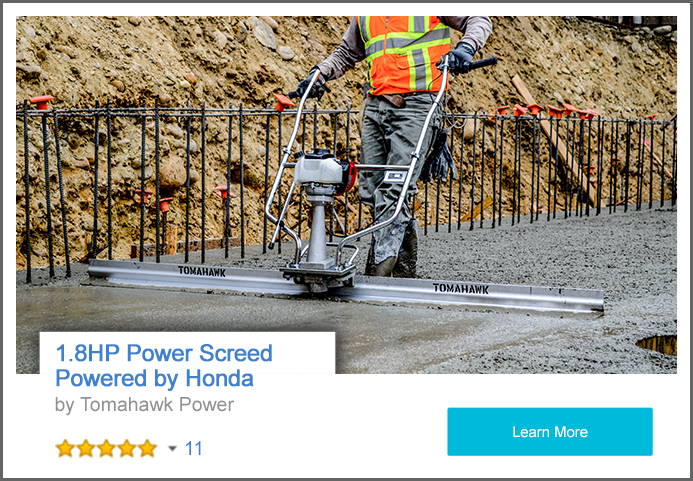
While pouring, spread the concrete out with a wide rake or shovel. Once about 5ft of your pour is complete begin smoothing out the concrete and pulling the excess back. Depending on the size of your pour you can use a wooden screed board or a power screed. Utilizing vibratory screeds will achieve the best results, while saving you time and back fatigue. You may choose to use a wooden screed board if your slab is too narrow for a power screed. If using a wooden board, after pulling the excess concrete back, go over the concrete slab one more time while sliding the 2x4 screed board back and forth (left and right) as you pull. Work your way back to other end of the wooden form in reachable pour sections, until the form is completely poured. You can pull the excess concrete off the back of the form. Let it harden before you remove it.
Tip: The back and forth motion with a wood screed board or vibration of a power screed fills in voids and brings cream up to the surface which helps with sedimentation.
If you do not have a power screed, you may use a bull float to push down more aggregate and bring more cream to the top. Push the float across the surface away from you, jiggle it slightly while pulling it back. When pushing the float away from you, make sure the edge is slightly raised so it does not dig into the concrete.
Tip: Run the bull float in more than one direction if you are able to.
After floating the slab your next step is to trowel. Depending on the size of the slab you can use anything from a small hand trowel, pole trowel, or walk behind gas powered trowel. Your concrete does not need to be completely flat. Your goal should be to remove the lines left by the bull float. With a pole trowel, a broom finish may be achieved to cover up smaller imperfections.
Tip: Make sure to wash your tools, within a few minutes of using them in concrete.
Next, round off the edges with an edging tool. At this point, the concrete will be dryer, so you may want to keep a hand trowel nearby to smooth out any lines missed in the initial troweling or to direct the surface cream to any voids that need filling.
Tip: You may pull a nylon broom over the surface area of the slab to give the concrete a non-slip finish.
Concrete can lose strength if it dries to fast. You may choose to spray a curing agent or sealants to slow down the curing process. There are a few types of sprayers you may use to apply your curing agent, but we have found gas powered backpack sprayers achieve the most even, consistent spraying pattern.
Tip: If you are on a budget, you may choose to sprinkle the concrete slab with water a couple times a day for one week to achieve a similar affect.
To reduce the effects of random cracking, you will need to make a straight relief cut down your slab. Wait about 24 hours and use a diamond blade to cut into your slab about an inch deep. A good rule of thumb for how far apart to space your joints is no more than 2-3 times the slab’s thickness.
Example: 4 in. Slab = Joints 8 to 12 ft. apart
You may find concrete to be difficult and frustrating, so make sure you are well prepared with the best tools before your next project.


